As an educator and a presenter, I have grown to love prezi. If you are unfamiliar, you need to become familiar! In a nutshell, it is an online software application to create and share "zoomable" creative presentations. However, it is a completely different and creative take on the old drab and boring slideshow approach. Here's an analogy: Powerpoint is to linear presentation as Prezi is to infinite zooming canvas. I found this prezi on Geocaching and just had to share. It will give you a great idea as to how a prezi looks and feels, and it is a great teaching tool for students and adults alike when it comes to the great sport of caching!
Enjoy,
Jason and the Educaching Team
Monday, December 3, 2012


Thursday, November 29, 2012
Geocaching and Education, part 8 - Great Hiding Spots
This is post #8 in a series of free resources for educators interested in using geocaching in education and other community groups like scouts or camps. The material is pulled directly from Educaching GPS Based Curriculum for Teachers. If interested in more resources, check out www.educaching.com.
Sincerely,
Jason and The Educaching Team
Great Hiding Spots
Before hiding anything on your school grounds or campus, it is a good idea to take a google map printout or Sketch the layout of your school campus on a sheet of paper. It is easy for me to forget hiding spots a few days later, but when I see them on a hand drawn map, it usually jogs my memory. Once you have a map, walk around and observe your area including buildings, fields, playgrounds, trees, shrubs, signs, and other pertinent landmarks. Take note of large hiding areas first. This will be helpful later on if you want to do multiple hunts one day...different hunting areas (with at least 10-20 hiding spots each) can provide variety for a group that you want to take out at different points throughout the year.
Now, mark or highlight the places on your map that would make the best hiding spots for items. Pretend you are hosting an Easter Egg hunt. Where would the best spots be for your students? You want the items to be hidden, but you don’t want them impossible to find. Never bury something. Rather, conceal it with mulch, stones, etc. to “camouflage” it from view. Never cause a student to climb to find something.
Here are a few ideas of some good hiding spots:
Trees – especially in the knots, holes, or forks where branches spread out, but do not make them climb for it
Shrubs – at the base or nearby…maybe you can use a little mulch to help camouflage something at the base of a shrub
Buildings – anywhere along the perimeter of your school building would be an appropriate place
Landmarks – school signs, playgrounds, flagpoles or other “significant” spots on your school campus
Thursday, November 1, 2012
Aligning to Technology Standards
Hello All,
Here are some of the ISTE standards that align while using GPS technology with students. I have highlighted specific strands that definitely fit. This resource should be helpful for those who want to make sure you are teaching technology standards while caching. It should also prove useful if you need to prove the validity of a program or if you are trying to obtain a tech. grant for using GPS.
Cheers,
Jason and the Educaching Team
Here are some of the ISTE standards that align while using GPS technology with students. I have highlighted specific strands that definitely fit. This resource should be helpful for those who want to make sure you are teaching technology standards while caching. It should also prove useful if you need to prove the validity of a program or if you are trying to obtain a tech. grant for using GPS.
Cheers,
Jason and the Educaching Team
Thursday, September 27, 2012
Geocaching and Education, part 7 - Student Grouping
This is post #7 in a series of free resources for educators interested in using geocaching in education and other community groups like scouts or camps. The material is pulled directly from Educaching GPS Based Curriculum for Teachers. If interested in more resources, check out www.educaching.com.
Sincerely,
Jason Hubbard, Author
Teamwork is a vital part of Educaching. Groups of two to four students are ideal for success. It is a good idea to assign roles to each individual group member to keep each student focused and responsible for specific tasks. Here are some ideas for individual roles within the groups:
- Navigator – This student will be in charge of the GPS receiver and navigating the group to their destinations.
- Scribe – This student will be responsible for writing down any information necessary like waypoints, clues, answers to questions, notes, etc. If you use the field sheets (included in the lessons), every student can write on their own, or the scribe can be responsible for one field sheet for the whole group.
- Reader – The job of the reader is to read any information (clues, articles, directions, etc.) found in a cache.
- Photographer (optional, but recommended) – If you have access to digital cameras, this student can take pictures of the group in action and take snapshots of their findings. For example, the students might greatly benefit in a tree-related hunt from taking pictures of their tree, leaf samples, and bark type for reference and for displaying in a presentation when they return to the classroom. Photographs can also be used to explain to parents, other teachers, and the community just what it is you are doing in Educaching!
- Illustrator – This role may be assigned to a student for several lessons that require drawing of any pictures or figures on the hunt. This role can be assigned in place of a photographer if you choose not to use cameras.
You can utilize all these roles, some of them, or come up with your own, but make sure students rotate through these roles frequently so that all students can have exposure to the GPS units.
Wednesday, May 23, 2012
Geocaching and Education, part 6 - Container Ideas
This is post #6 in a series of free resources for educators interested in using geocaching in education and other community groups like scouts or camps. The material is pulled directly from Educaching GPS Based Curriculum for Teachers. If interested in more resources, check out www.educaching.com.
Sincerely,
Jason Hubbard, Author
When hiding geocaches for your students, you will need good cache containers. The most important thing about the container is that you do not want it to be easily noticed. This is for the sake of the students (so it is not too easy for them to find), but you also do not want a non-student finding it and thinking it is garbage or tampering with it in any way, ruining the experience for your students. A container should be fairly small and somewhat camouflaged. It can be camouflaged by its surroundings (i.e. shrubs, trees, bark, mulch, and so on) or, you can use camouflage (green or otherwise) tape to wrap around smaller containers to make them look more natural, like they “fit in” with the surrounding environment. I have also used various brown and green camouflage spray paints (around $5 per can or less). You can take all your containers outside, put them on a sheet of cardboard, and spray them all at the same time. They may need repainted every few years, as the paint tends to wear off with handling. Listed here are a few ideas of what you can use to hide items.
- Plastic film canisters – Yes, they still have these around! Go to your nearest photo lab or grocery store photo counter and simply tell them you are an educator and need these for a project. They will most likely give you a bagful! Amazingly, people are still using 35mm film out there.
- Waterproof match container – These can be bought at little cost in the camping section of many stores and are perfect for hiding tiny, rolled up notes.
- Plastic zip-style baggies – These, of course, are very affordable, waterproof, and can be reused. Be careful that there is something heavy enough in them that they won’t blow away!
- Plastic food containers with lids – Coming in all shapes and sizes, these containers might be just what you need for hiding a variety of items. These containers can be easily painted or camo-taped.
- Plastic plumbing pipes with caps – These provide a capsule-like container for storing almost any item and can be different diameters in size. They can be cut at any length if you or someone you know is handy enough. They can be made economically with materials bought at most hardware and Do-It-Yourself stores. SAFETY NOTE: Think first...would this look too much like an "unsafe" container and draw suspicion? If so, maybe it could use a label that says it is part of an educational scavenger hunt. Otherwise, avoid this type of container.
- Hide-A-Key containers – For an interesting twist, there are some great “fake rock” containers on the market that hide something small, like a key. This could get pricy to buy several, but it would be fun to have one or two and see what the students do when they stumble upon it!
- Ammo Boxes – If you have a military surplus store nearby, you might want to see if they have ammo boxes. These can hold larger items, lock down to keep moisture out, and are already painted to blend in. Many hunting/fishing/camping stores have plastic versions of these.
- Mint and Gum Containers – Look for plastic mint and gum containers that would be able to hide small messages, then paint them or wrap them in camouflage tape.
Use your imagination to come up with more container ideas. Feel free to post your ideas here to share with others.
Wednesday, April 4, 2012
Historical Geocaching in Maumee
Last evening, my family and I visited a great geocache in Maumee, Ohio called Dudley is Surprised Again. This is one of those geocaches that instills a bit of history in the adventure. What was even more fun is that when we approached the cache, so was a big group of boy scouts. They were just in the area hunting down a historical marker to learn more about the War of 1812, which is rich in our geographical location. Since I had the Geocaching app on my iPod and had the history at my fingertips, the scout leaders were gracious enough to let me put on my teaching hat and read them the story and teach a bit about Dudley's massacre. It's a great story, so I'm posting it below for your enjoyment. Pride comes before the fall...big time. Check it out:

 All that remains as reminders of the carnage that took place in May of 1813 are the preserved sites of Fort Meigs and Miamis, and a historical marker in front of the Maumee Library on River Road.
After reading, maybe this gives you some ideas for some historical educaching you can plant in your area. Perhaps you can take your troop, youth group, or class on a nice walk using GPS to guide and weave your way through some local history too.
Keep 'em caching,
Jason Hubbard
Want more Maumee, Ohio history? Click here.

It was on the fifth of May that the Americans suffered a particularly bloody and unnecessary defeat known as “Dudley's Defeat.”
The defeat, also known as “Dudley's Massacre,” involved military brilliance and bungling, cowardice and bravery, and a manifestation of the violence that often accompanied life in America's early days.
It occurred during the first siege of Fort Meigs during the War of 1812.
On the night of May 4, 1200 reinforcements, consisting mostly of new Kentucky recruits under the command of General Green Clay, neared the fort. Harrison sent instructions to Clay to send a detachment of 800 men to surprise-attack the British batteries at dawn the following morning.
 |
| Fort Meigs |
The objective was to spike the cannons, rendering them useless, and hurry to the safety of Fort Meigs before British reinforcements could arrive from Fort Miamis, which was just downriver (about the 1800 block of River Road at Michigan Avenue, today).
The detachment, led by Colonel William Dudley, attacked the British battery at dawn, carrying out their mission successfully. However, the events that followed led ultimately to Dudley's defeat.
Instead of returning to the fort as planned, the raw recruits, exhilarated by their success, pursued some straggling Indians into the forest (“every Kentuckian is crazy at the sight of an Indian,” the old history books say). Dudley and his officers tried vainly to stop them but were futile in their efforts and joined in the fray.
The trap had been set. For the Americans to pursue them into the forest was exactly what the Indians wanted. Once they had reached an area where the Maumee Library now stands, the British and Indians counterattacked.
A fierce battle ensued, lasting several hours. The Americans attempted to retreat toward the river but found themselves cut off
When the battle was over, about 220 of Dudley's men lay dead, while 350 were captured. About 200 managed to make their way across river and back to Fort Meigs. Colonel Dudley was killed during the battle and scalped.
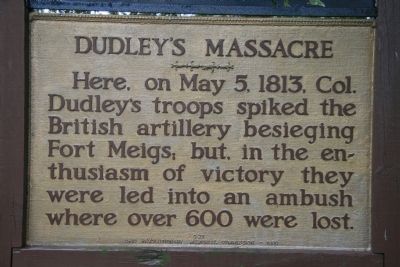 All that remains as reminders of the carnage that took place in May of 1813 are the preserved sites of Fort Meigs and Miamis, and a historical marker in front of the Maumee Library on River Road.
Keep 'em caching,
Jason Hubbard
Want more Maumee, Ohio history? Click here.
Wednesday, March 21, 2012
Geocaching and Education, part 5 - Must Have vs. Nice to Have
This is post #5 in a series of free resources for educators interested in using geocaching in education and other community groups like scouts or camps. The material is pulled directly from Educaching GPS Based Curriculum for Teachers. If interested in more resources, check out www.educaching.com.
Sincerely,
Jason Hubbard, Author
Okay. Now that you have some of the standard features explained, let’s look at the “Must Have” and the “Nice To Have” features in regard to Educaching.

There are obviously many other features you may deem as “Must Have” or “Nice To Have,” but looking at this from an Educaching point of view, these are a few that stand out. For detailed descriptions, images, and product reviews of receiver models available, do some Internet research or talk with someone who is an avid geocacher. Don't neglect to use online forums, as many have come before you going through the same process. The Geocaching in Education forum at Groundspeak is a great place to start. The time you invest now in your search for the right receivers will help you acquire the right equipment.
Subscribe to:
Posts (Atom)