Thursday, November 1, 2012

Aligning to Technology Standards

Hello All,
Here are some of the ISTE standards that align while using GPS technology with students. I have highlighted specific strands that definitely fit. This resource should be helpful for those who want to make sure you are teaching technology standards while caching. It should also prove useful if you need to prove the validity of a program or if you are trying to obtain a tech. grant for using GPS.
Cheers,
Jason and the Educaching Team


Thursday, September 27, 2012

Geocaching and Education, part 7 - Student Grouping


This is post #7 in a series of free resources for educators interested in using geocaching in education and other community groups like scouts or camps. The material is pulled directly from Educaching GPS Based Curriculum for Teachers. If interested in more resources, check out www.educaching.com.

Sincerely,
Jason Hubbard, Author


Teamwork is a vital part of Educaching. Groups of two to four students are ideal for success. It is a good idea to assign roles to each individual group member to keep each student focused and responsible for specific tasks. Here are some ideas for individual roles within the groups:

  • Navigator – This student will be in charge of the GPS receiver and navigating the group to their destinations.
  • Scribe – This student will be responsible for writing down any information necessary like waypoints, clues, answers to questions, notes, etc. If you use the field sheets (included in the lessons), every student can write on their own, or the scribe can be responsible for one field sheet for the whole group.
  • Reader – The job of the reader is to read any information (clues, articles, directions, etc.) found in a cache.
  • Photographer (optional, but recommended) – If you have access to digital cameras, this student can take pictures of the group in action and take snapshots of their findings. For example, the students might greatly benefit in a tree-related hunt from taking pictures of their tree, leaf samples, and bark type for reference and for displaying in a presentation when they return to the classroom. Photographs can also be used to explain to parents, other teachers, and the community just what it is you are doing in Educaching!
  • Illustrator – This role may be assigned to a student for several lessons that require drawing of any pictures or figures on the hunt. This role can be assigned in place of a photographer if you choose not to use cameras. 
You can utilize all these roles, some of them, or come up with your own, but make sure students rotate through these roles frequently so that all students can have exposure to the GPS units.


Wednesday, May 23, 2012

Geocaching and Education, part 6 - Container Ideas


This is post #6 in a series of free resources for educators interested in using geocaching in education and other community groups like scouts or camps. The material is pulled directly from Educaching GPS Based Curriculum for Teachers. If interested in more resources, check out www.educaching.com.

Sincerely,
Jason Hubbard, Author


        When hiding geocaches for your students, you will need good cache containers. The most important thing about the container is that you do not want it to be easily noticed. This is for the sake of the students (so it is not too easy for them to find), but you also do not want a non-student finding it and thinking it is garbage or tampering with it in any way, ruining the experience for your students. A container should be fairly small and somewhat camouflaged. It can be camouflaged by its surroundings (i.e. shrubs, trees, bark, mulch, and so on) or, you can use camouflage (green or otherwise) tape to wrap around smaller containers to make them look more natural, like they “fit in” with the surrounding environment. I have also used various brown and green camouflage spray paints (around $5 per can or less). You can take all your containers outside, put them on a sheet of cardboard, and spray them all at the same time. They may need repainted every few years, as the paint tends to wear off with handling. Listed here are a few ideas of what you can use to hide items.
  • Plastic film canisters – Yes, they still have these around! Go to your nearest photo lab or grocery store photo counter and simply tell them you are an educator and need these for a project. They will most likely give you a bagful! Amazingly, people are still using 35mm film out there. 
  • Waterproof match container – These can be bought at little cost in the camping section of many stores and are perfect for hiding tiny, rolled up notes.
  • Plastic zip-style baggies – These, of course, are very affordable, waterproof, and can be reused. Be careful that there is something heavy enough in them that they won’t blow away!
  • Plastic food containers with lids – Coming in all shapes and sizes, these containers might be just what you need for hiding a variety of items. These containers can be easily painted or camo-taped.
  • Plastic plumbing pipes with caps – These provide a capsule-like container for storing almost any item and can be different diameters in size. They can be cut at any length if you or someone you know is handy enough. They can be made economically with materials bought at most hardware and Do-It-Yourself stores. SAFETY NOTE: Think first...would this look too much like an "unsafe" container and draw suspicion? If so, maybe it could use a label that says it is part of an educational scavenger hunt. Otherwise, avoid this type of container.
  • Hide-A-Key containers – For an interesting twist, there are some great “fake rock” containers on the market that hide something small, like a key. This could get pricy to buy several, but it would be fun to have one or two and see what the students do when they stumble upon it!
  • Ammo Boxes – If you have a military surplus store nearby, you might want to see if they have ammo boxes. These can hold larger items, lock down to keep moisture out, and are already painted to blend in. Many hunting/fishing/camping stores have plastic versions of these.
  • Mint and Gum Containers – Look for plastic mint and gum containers that would be able to hide small messages, then paint them or wrap them in camouflage tape.
Use your imagination to come up with more container ideas. Feel free to post your ideas here to share with others. 

Wednesday, April 4, 2012

Historical Geocaching in Maumee

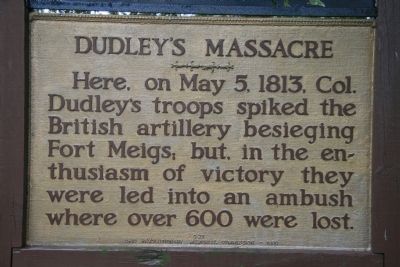
Last evening, my family and I visited a great geocache in Maumee, Ohio called Dudley is Surprised Again. This is one of those geocaches that instills a bit of history in the adventure. What was even more fun is that when we approached the cache, so was a big group of boy scouts. They were just in the area hunting down a historical marker to learn more about the War of 1812, which is rich in our geographical location. Since I had the Geocaching app on my iPod and had the history at my fingertips, the scout leaders were gracious enough to let me put on my teaching hat and read them the story and teach a bit about Dudley's massacre. It's a great story, so I'm posting it below for your enjoyment. Pride comes before the fall...big time. Check it out:

It was on the fifth of May that the Americans suffered a particularly bloody and unnecessary defeat known as “Dudley's Defeat.”
The defeat, also known as “Dudley's Massacre,” involved military brilliance and bungling, cowardice and bravery, and a manifestation of the violence that often accompanied life in America's early days.
It occurred during the first siege of Fort Meigs during the War of 1812.
On the night of May 4, 1200 reinforcements, consisting mostly of new Kentucky recruits under the command of General Green Clay, neared the fort. Harrison sent instructions to Clay to send a detachment of 800 men to surprise-attack the British batteries at dawn the following morning.
Fort Meigs
The objective was to spike the cannons, rendering them useless, and hurry to the safety of Fort Meigs before British reinforcements could arrive from Fort Miamis, which was just downriver (about the 1800 block of River Road at Michigan Avenue, today).
The detachment, led by Colonel William Dudley, attacked the British battery at dawn, carrying out their mission successfully. However, the events that followed led ultimately to Dudley's defeat.
Instead of returning to the fort as planned, the raw recruits, exhilarated by their success, pursued some straggling Indians into the forest (“every Kentuckian is crazy at the sight of an Indian,” the old history books say). Dudley and his officers tried vainly to stop them but were futile in their efforts and joined in the fray.
The trap had been set. For the Americans to pursue them into the forest was exactly what the Indians wanted. Once they had reached an area where the Maumee Library now stands, the British and Indians counterattacked.
A fierce battle ensued, lasting several hours. The Americans attempted to retreat toward the river but found themselves cut off
When the battle was over, about 220 of Dudley's men lay dead, while 350 were captured. About 200 managed to make their way across river and back to Fort Meigs. Colonel Dudley was killed during the battle and scalped.
Dudley's Massacre Marker Photo, Click for full sizeAll that remains as reminders of the carnage that took place in May of 1813 are the preserved sites of Fort Meigs and Miamis, and a historical marker in front of the Maumee Library on River Road.


After reading, maybe this gives you some ideas for some historical educaching you can plant in your area. Perhaps you can take your troop, youth group, or class on a nice walk using GPS to guide and weave your way through some local history too.

Keep 'em caching,
Jason Hubbard


Want more Maumee, Ohio history? Click here.

Wednesday, March 21, 2012

Geocaching and Education, part 5 - Must Have vs. Nice to Have

This is post #5 in a series of free resources for educators interested in using geocaching in education and other community groups like scouts or camps. The material is pulled directly from Educaching GPS Based Curriculum for Teachers. If interested in more resources, check out www.educaching.com.
Sincerely,
Jason Hubbard, Author


Okay. Now that you have some of the standard features explained, let’s look at the “Must Have” and the “Nice To Have” features in regard to Educaching.

There are obviously many other features you may deem as “Must Have” or “Nice To Have,” but looking at this from an Educaching point of view, these are a few that stand out. For detailed descriptions, images, and product reviews of receiver models available, do some Internet research or talk with someone who is an avid geocacher. Don't neglect to use online forums, as many have come before you going through the same process. The Geocaching in Education forum at Groundspeak is a great place to start. The time you invest now in your search for the right receivers will help you acquire the right equipment.

Wednesday, February 1, 2012

Geocaching and Education, part 4 - Equipment and Gear

This is post #4 in a series of free resources for educators interested in using geocaching in education and other community groups like scouts or camps. The material is pulled directly from Educaching GPS Based Curriculum for Teachers. If interested in more resources, check out www.educaching.com.
Sincerely,
Jason Hubbard, Author

Equipment and Gear, Part 1:
To begin Educaching, you must have the appropriate equipment. This section will discuss what you must have to get started. We will explore the features available on most GPS devices, and then take a look at some “must have” features versus some nice, but not necessary ones. We will present the other equipment you will need for implementing the lessons such as containers, string, tent stakes (for plotting areas of land), and measuring tapes. 
GPS Receivers
One of the most exciting parts of Educaching is working with a high-tech gadget! When compared to the price of a computer, there is a lot that a student can do with a handy, cost-efficient tool like a GPS receiver!
Just imagine the features a GPS receiver can provide: 
locations anywhere on Earth
built-in maps
altitude
speed
odometer
electronic compass
sunrise/sunset times
best hunting/fishing times
built-in geolocation games (some models)
easy computer connection for downloading waypoints
uploading routes to see where you’ve been on computer maps
and much more!
However, the GPS receiver is also the most expensive piece of gear required for Educaching, and you definitely will want more than one! Do not let this fact discourage you from doing something as innovative and exciting as Educaching. In the Acquiring GPS section you will find helpful ways to obtain enough GPS receivers for Educaching at your school. Some very functional and cost-efficient models can be purchased for approximately $100 each. Other models with more features and increased accuracy can be purchased for around $200. You can spend much more than this on a GPS receiver that has color and other options, but this type of receiver provides more than is required to work with the lesson plans.  
Let’s begin by taking a look at the features that are standard on most GPS receivers.
  • Altitude – When the unit is fixed on at least 4 satellites, it can give a 3-dimensional fix on your location (latitude, longitude, and altitude). Note: When your unit is receiving signals from 3 satellites, it will only give you latitude and longitude, and reception from less than 3 satellites will not be able to triangulate your position.
  • Antenna – For most units, the antenna is within the unit and may get better reception when the unit is held a certain way (ie. in a vertical or horizontal position…read your user manual to determine which is best). A higher priced model might sport a cell phone-like antenna or may have a jack for the attachment of a remote antenna, which receives better reception in a car or under heavy tree cover.
  • Basemap – Generally, the higher priced receiver you acquire, the more maps that will come stored already in its memory. Basemaps provide a map background on your unit to show major cities and roads. Many low-priced GPS receivers do not have basemaps loaded, but you do not need a basemap for Educaching.
  • Battery Life – This is a feature that should not be overlooked! You don’t want to always be changing batteries on your classroom set of receivers. There are some battery-saver modes on most GPS receivers to help extend battery life. Be sure you have the budget to maintain a sufficient inventory on hand of batteries. 
  • Channels – Most receivers are equipped with 12 channels to help process satellite information faster.  Receivers with less than 12 channels will not be sufficient for processing the Educaching tasks.  
  • Clock – This is a helpful feature to keep your students on task and help them wrap up their hunt at the appropriate time. The time can usually be set to a standard 12 hour or military 24 hour clock.
  • Compass – GPS receivers give you compass information, as long as you’re moving. If a student stops walking, the electronic needle may jump around or stop moving altogether. It may be helpful to equip students with a small, inexpensive compass you can attach to the lanyard of each GPSr and teach students the basics of using one.
  • Computer Compatibility – Many receivers come with a USB or PC interface cable for easy attachment to a computer. The benefits of this are numerous to Educaching. The major benefit is that you can download several waypoints for an Educache hunt into each of your students’ units quickly, prior to the hunt if you’d like. This helps students by saving time and preventing errors by incorrectly entering data into the unit. Seek out product web sites for valuable information regarding computer compatibility and be sure a unit does what you want it to, before you buy it!
  • Memory – Receivers use an internal memory (like a computer) to store your saved waypoints and basemap data (if available). Memory storage space ranges from 1Mb of data (enough to store plenty of waypoints and data for Educaching, but not enough memory for basemaps) up to several gigabytes (this allows for a great deal of maps to be stored on the unit). 
  • Timer – Many receivers have a start/stop timer with lap feature. This would be extremely helpful, for example, in the lesson The Estimation Olympics, where the students must time certain events during their hunt.
  • Tracks – This is a feature that shows where you’ve been with your GPS receiver.  On the receiver’s screen there will be a series of dots, called trackpoints, that display the path traveled. This standard feature can be very helpful to students during Educaching as they plot perimeters during a math lesson or if they want to “walk” the trail of a shape for an art lesson.
  • Waypoints/Routes – Waypoints are stored coordinates that you enter for the students to find. Basic models will hold up to 500, which is plenty. Routes are a series of waypoints that can be followed from beginning to end. So, if you want students to find educaches in a particular order, you can save a route for them in the receiver’s memory that will lead them one by one to each educache in the predetermined order.
  • WAAS enabled – Some models are equipped with this feature that increases the accuracy of finding educaches that are hidden. When WAAS is enabled, you can get within 3 meters of an educache, as opposed to 15 meters. However, be aware that enabling this feature drains the unit’s battery life much more quickly.
  • Waterproof – Usually there is a rating on each GPSr that identifies how water resistant the unit is. Since students are going to be using these receivers, you obviously want the most rugged and durable units you can find. At the least, you will want to acquire a protective case for each unit to extend its life. Otherwise, you may find it necessary to acquire new equipment after only one year of use.
  • Waypoint Averaging – This is usually a standard on a GPS receiver and is definitely a feature you want. When you hide an educache, you must use your receiver to locate the coordinates and mark the waypoint. Sometimes the GPS satellites can give information that is a little off, so you can use waypoint averaging to “average” the information from all the satellites’ signals to give you the most accurate location of your educache. By waypoint averaging, you make it easier for your students to rely on their equipment and lower any frustration level.

Wednesday, January 18, 2012

Geocaching and Education, part 3 - Subject Integration

This is post #3 in a series of free resources for educators interested in using geocaching in education and other community groups like scouts or camps. The material is pulled directly from Educaching GPS Based Curriculum for Teachers. If interested in more resources, check out www.educaching.com.
Sincerely,
Jason Hubbard, Author
    
         Every subject area can be combined with GPS technology to create challenging and educational hunts for your students. Let me give you an example:
Let’s say you want to have your students read some newspaper articles in order to keep up with current events about a particular topic. Take a few articles of your choice, cut them out, and hide them as educaches. Your students form groups, take a GPS receiver, paper and a pencil, and go out to seek their group’s article. Once found, each group will read their article aloud or silently and write a brief summary of the article to later present to the class. Voila! You’ve just tied in reading, writing, social studies (or whatever subject the articles cover), geography (latitude and longitude), and technology. 
It is easy to tailor Educaching to meet the needs of your classroom.
Think about the elements of discovery available in your local area. What local history is just waiting to be explored through the use of GPS? A historic fort? An old canal or lock system? In regard to ecology, is there a river system or forest that can be mapped, explored, or discovered by your students? Is there a problem in your community that could be solved by your students and connect them to technology and their duty as a citizen? For example, in the area I teach and live, there is a natural invader which has sprung up over the past few years, known as the emerald ash borer. This mean, green beetle devastates large populations of ash trees and has been spreading across the Midwest states. Through awareness, the bug’s progress has been hampered, fortunately. What opportunities do you as a teacher see to promote further awareness to you students and the community you teach in? Could you and your students team up with the local forestry department or city employees to map out areas of the community that have been invaded by the emerald ash borer? Could your students continue to keep tabs on the situation over the years and help the city work toward a solution? Why not? The possibilities are unlimited. What areas of your curriculum could be enhanced through the use of the geocaching concept at school?